Outline
This procedure covers epoxy mixing and handling. The epoxy this procedure covers has multiple uses, including solder mask repair, base board repair, circuitry over-coating, and delamination repair.
Note: Two-part epoxies will generally have the best properties for high-strength or high-temperature applications.
Minimum Skill Level - Intermediate
Recommended for technicians with skills in basic soldering and component rework, but may be inexperienced in general repair/rework procedures.Conformance Level - High
This procedure most closely duplicates the physical characteristics of the original, and most probably complies with all the functional, environmental and serviceability factors.| Procedure References | |
| 1-0 | 1.0 Foreword |
| 2-1 | 2.1 Handling Electronic Assemblies |
| 2-2 | 2.2 Cleaning Procedures |
| 2-5 | 2.5 Baking and Preheating |
Tools and Materials
|
Circuit Bond Epoxy
Clear, superior strength epoxy in two-compartment plastic packages. |
General purpose cleaner for removing contamination. |
|
Cleaning Brushes
Disposable brushes for solvent cleaning and application of coatings. |
|
Color Agents
One part, semi-paste ink used to tint the color of epoxy and for direct printing on circuit board surfaces. |
|
Foam Swab, Small
Swabs for use with solvents and application of color agents and epoxies. |
General purpose oven for drying, baking and curing epoxies. |
|
Repair Skills Practice Kit
Training kit to practice circuit board repair skills prior to testing for certification. |
Nonabrasive, low-linting wipes for cleanup. |
Procedure
Epoxy Specifications
Epoxies used for circuit board repair and rework require specific properties. The Epoxy referenced in this procedure is a clear, low-viscosity, superior-strength two-part epoxy. It is available in two-compartment plastic packages, so no measuring is needed.
See the Related Products below for details about the Epoxy referenced in this procedure.
Preparation
The area where the epoxy is to be applied should be prepared before mixing. This preparation may include preheating the affected area to improve the absorption of the applied epoxy. The entire circuit board may also be heated in an oven or with a heat lamp.
Caution: Some components may be sensitive to high temperatures.
Prepackaged Two-Part Epoxy
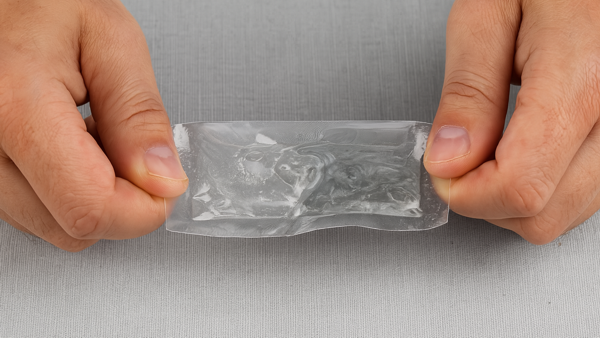
- Remove the clip separating the resin and hardener. Mix by squeezing both halves together with your fingers. Mix for at least one minute to ensure a complete mix of the resin and activator.
- Cut open one end of the epoxy tube and squeeze the contents into a mixing cup. Mix again with a stick to ensure a thorough mixture of the resin and hardener.
Note: Remove the clip separating the resin and hardener for bubble-free epoxy. Cut open one end of the Epoxy tube and squeeze the contents into a mixing cup. Slowly stir the mixture with the mixing stick. Be sure to stir the mixture for at least 2 minutes to ensure all the resin and hardener are thoroughly mixed. - If needed, add a color agent to the mixed epoxy. Stir slowly to prevent bubbles.
- Apply or use as needed. (See Figure 1)
- Cure the epoxy for 24 hours at room temperature or 4 hours @ 150°F (65 °C)
Evaluation
- Visual examination of epoxy for texture and color match.
- Testing of the epoxy surface for complete cure.
- Electrical tests as applicable.
Images