Outline
This procedure covers the general guidelines for soldering through hole components using a point-to-point soldering method. There is basically only one style of through-hole component. The soldering principles are the same whether there are a few leads or many or whether the component is large or small.
Minimum Skill Level - Intermediate
Recommended for technicians with skills in basic soldering and component rework, but may be inexperienced in general repair/rework procedures.Conformance Level - Medium
This procedure may have some variance with the physical character of the original and most likely varies with some of the functional, environmental and serviceability factors.| Procedure References | |
| 1-0 | 1.0 Foreword |
| 2-1 | 2.1 Handling Electronic Assemblies |
| 2-2 | 2.2 Cleaning Procedures |
| 2-5 | 2.5 Baking and Preheating |
| 7-1-1 | 7.1.1 Soldering Basics |
| 7-1-2 | 7.1.2 Preparation For Soldering And Component Removal |
| 7-1-3 | 7.1.3 Solder Joint Acceptance Criteria |
Tools and Materials
General purpose cleaner for removing contamination. |
|
Flex-Rack PCB Holder
Sturdy rack for PCBs used for rework and positioning. |
Precision microscope with stand and lighting for work and inspection. |
|
Precision Tool Set
Nine precision-crafted tools for detailed circuit board work. |
Properly maintained soldering iron and properly sized soldering iron tips. |
|
Soldering Skills Practice Kit
Training kit to practice circuit board soldering skills prior to testing for certification. |
Nonabrasive, low-linting wipes for cleanup. |
Procedure
Procedure
- If needed, form the component and clean the area.
- Insert the component into the plated hole. If needed, secure in place by bending leads or other mechanical means.
- If needed, apply liquid flux to the plated holes and pads.
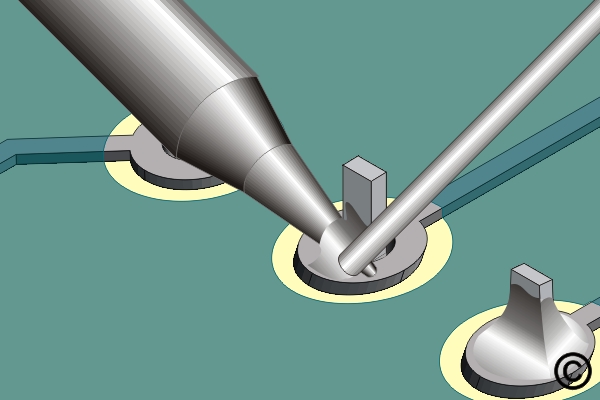
- Place the soldering iron tip at the pad and component lead junction. Apply a small amount of solder at the junction of the soldering iron tip and lead to make a solder bridge. (See Figure 1)
Note: The size of the solder is important when soldering small components. If the solder is too large, it is easy to melt too much solder into the joint. If the solder is too small, it can take too long to melt the optimum amount into the joint.
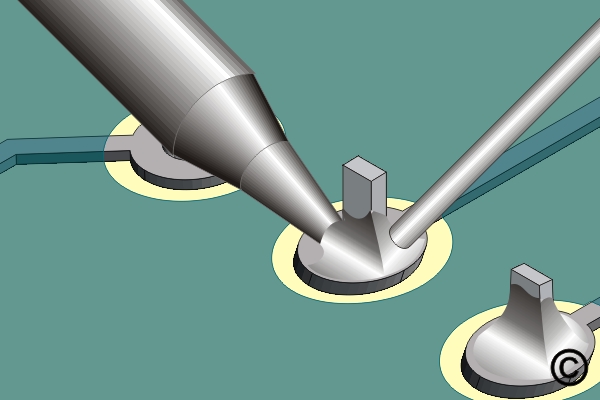
Caution: Avoid exerting any pressure on the pad. - Immediately feed the solder into the joint from the side opposite of the soldering iron tip until the proper fillet is achieved. Remove the solder, then remove the iron. The iron may be swept over the end of the component lead to cover it with solder. (See Figure 2)
Note: Apply the solder to the side opposite of the soldering iron tip so that the work surfaces and not the iron will melt the solder. - On multiple lead components, solder the opposite corners first to stabilize the component. Followed by soldering the remaining leads in a random pattern to reduce excessive heat buildup in one area.
- Clean the flux residue, if required, and inspect.
Images
Soldering Through Hole Components, Point To Point Method
Apply solder at the junction of soldering iron tip and lead to make a solder bridge.
Feed solder into the joint from the side opposite from the iron tip until the proper fillet is achieved.