Base Board Burn Repair - How and Why
[unknown placeholder $article.blog_tech_summary$]
REQUEST FOR QUOTE BLOGS INDEX

|
|
22 Parkridge Road Haverhill, MA 01835 USA www.circuitrework.com |
Cosmetic surgery is big business today, but our discussion here is not about facelifts or tummy tucks. We're concerned about the cosmetic touch-ups we often have to apply to circuit boards.
While we're all familiar with reworking components, repairing pads, adding jumper wires, and the like, we have been talking about the practical application of repairing or restoring functional circuitry. What about repairs to the non-functional parts of the board? Are "cosmetic" repairs even necessary?
While the subject may seem of minor importance, cosmetic repairs to a circuit board - such as repairing a burnt spot or jagged hole resulting from physical damage - are indeed an important part of circuit board repair! Remember that a circuit board has value, and just because it may be enclosed in an end product does not mean the board will never again see the light of day for repair or replacement.
Baseboard damage can expose interior laminate layers to moisture or contamination, and many companies' quality standards and acceptance criteria also include cosmetic appearance.
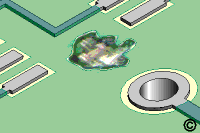
One of the most common types of baseboard damage is a burn. The charred area's size, color, and layer depth will obviously be determined by how much heat was applied and for how long. Nevertheless, the damage can be repaired, and the board restored to its original integrity - and even appearance - by the following procedure.
Some specialized tools are needed, and the liquid epoxy repair material can even be colored with color agents to match the color of the surrounding original board material. Like a painter mixing colors from a palette, this procedure is one of the few that bring a little creativity into the process of circuit board repair.
Micro-Drills and Ball Mills
The first step in this repair procedure is to remove the burnt or damaged material from the area, cleaning down to the fresh, undamaged epoxy/glass board material below and around. To do this, however, one needs special tools that aren't difficult to find or expensive.
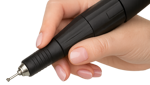
In our facility, we use a tool called the Micro-Drill. (See Figure 3) This unit is ideal for bench-top milling, drilling, grinding, cutting, or sanding. Unlike other hand-held drilling tools, these Micro-Drills have a tiny, high-speed DC motor in the handpiece, eliminating bothersome drive cables and enhancing control. A separate power supply keeps the handpiece lightweight and reduces fatigue. These features are important when you need to maintain a light touch.
We also use Ball Mills in the Micro-Drill. These ball mills are made of dental-grade carbide steel for precision cutting and long life, with 093" diameter shanks. Carbide ball mills, turning at high speed, will grind material quickly, so operator care is essential.
The Repair Procedure
Clean the damaged area. This means removing dust, contamination, oils, etc. A swab saturated with solvent (IPA) should be sufficient.
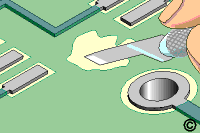
Scrape away loose, damaged baseboard material using a knife or dental-style scraper. (See Figure 2). All damaged baseboard material and solder mask must be removed from the surface.
Then, mill away the damaged baseboard material using the Micro-Drill and ball mill. To ensure all damaged material has been removed, flood the area with alcohol or solvent. Damaged internal fibers in the base material will be clearly visible. Remove all loose material and clean the area.
If needed, apply high-temperature tape to protect exposed parts of the circuit board.
Now it's time to fill the cavity with epoxy. You may want to preheat the board - essentially warming it up - before filling the area with epoxy. A preheated circuit board will allow the epoxy to flow easily and level out. Epoxy applied to an unheated circuit board may settle below the board surface as the epoxy cures, leaving a slight depression.
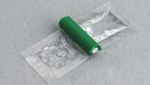
Board repairs are best performed using clear, low-viscosity, high-strength epoxies. These are usually 2-component epoxies containing an activator and a resin. These epoxies are available in pre-measured plastic packages, so they're easy to use, and the operator never has to measure them. The epoxy also needs a working pot life of 30 minutes or more.
The coloring agent should be added while mixing the epoxy. Selection (and ordering) of coloring agents should be done in advance; otherwise, having a selection on hand is good.
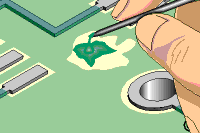
Once the epoxy and colorant are mixed, fill the area with epoxy up to and flush with the preheated circuit board surface. No fibers of laminate material should be exposed. A mixing stick sharpened at the end may be used to apply and spread the epoxy. (See Figure 4).
For large areas, apply the epoxy with a foam swab to create a textured surface. A slight overfill of epoxy may be desired to accommodate any shrinkage as the epoxy cures. Cure the epoxy as recommended.
Use a precision knife or fine scraper and scrape off any excess epoxy if needed. Scrape until the new epoxy surface is level with the surrounding circuit board surface. Then, remove all loose material and clean the area. If some scraping is necessary, mixing and applying an additional thin coat of epoxy may be advisable to seal any scraped areas.
Finally, visually examine the repaired area for texture and color match, and apply electrical tests to conductors around the repaired area as applicable.